Changelog

Keep track of all new product updates, fixes, and improvements.

Onboarding Extension Now Auto-Fills Your Domain and Location ID

The onboarding extension can now pull your domain and Location ID straight from the current tab — no more typing or copy-pasting either value by hand.

What's New

  • A new Fetch from URL link above the Domain field, and a separate one above the Location ID field
  • Each one reads the corresponding value directly from the URL of the tab you're on and fills in that field
  • Works for agency and sub-account setup — switch to a different sub-account tab and fetch again to pull in its Location ID

Why It Matters

  • Removes manual copying and pasting for both fields
  • Makes it easier to switch to a second sub-account and fetch its details once you've already onboarded the first
  • Cuts down the risk of a mistyped or mismatched Location ID sending you to the wrong sub-account's checklist

Retrieve User Profile Now Updates the Contact Record

The Retrieve User Profile action now writes everything it fetches straight back to the matched contact — no extra Update Contact step required after a profile fetch.

What's New

  • After a successful profile fetch, the action automatically updates the contact with the retrieved data: photo, headline, summary, field IDs, connection status, and more
  • Updates use the same field mappings already set in the LinkedIn settings panel — nothing to reconfigure
  • No changes to the action's inputs, outputs, or how it runs in a workflow — previously, the action fetched profile data and returned it to the workflow but never touched the contact record; this write-back is the only change

Why It Matters

  • Removes the Update Contact step most workflows had to add manually after every profile fetch
  • Contact records stay current the moment a profile is retrieved, with zero added workflow logic
  • Existing workflows keep working exactly as they do today — the update happens automatically alongside the fetch

Read the Retrieve User Profile documentation

New Connection Trigger Now Updates the Matched Contact

The New Connection trigger now writes connection status straight back to the matched contact — and returns three new payload fields for anyone building custom logic around a connection.

What's New

  • Three new fields on the trigger payload: is_relationshipinvitation_status, and network_distance (returns FIRST_DEGREE for new connections)
  • A non-blocking write-back: if a contact was matched, the trigger now stamps that record after it sends — Is Connection → true, Invitation Status → cleared, Network Distance → FIRST_DEGREE
  • Previously, the trigger fired and stopped there — the matched contact was never touched, and every workflow had to add its own Update Contact step to record the connection

Why It Matters

  • One less step in every New Connection workflow — connection status lands on the contact automatically
  • The write-back runs after the trigger sends, so it never adds delay or blocks the rest of your workflow
  • The new payload fields give you connection context — relationship status, invitation state, network distance — without a separate lookup

Read the New Connection documentation

Workflow Trigger - New Invitation Received

Connection requests used to sit in your LinkedIn inbox until someone remembered to check. The new New Invitation Received trigger runs a workflow whenever someone sends a connection request to your connected LinkedIn account.

What's New

  • New workflow trigger that fires when the connected LinkedIn account receives a connection request
  • Requests are checked periodically throughout the day, and the trigger fires once per received invitation
  • Returns the sender's profile details, the note attached to the request, and everything needed to action it — including the Invitation ID and Shared Secret used by the Handle Invitation Received action
  • Trigger status is visible in the account dashboard — open the sub-account details to see each trigger listed with a live Active indicator

How It Works

  • When the trigger fires, start with a Find Contact action using the Provider ID from the payload — and create the contact if none is found
  • Qualify the sender with Retrieve User Profile, and store their invitation note on the contact for context — or let an AI step review the profile, categorize the sender, and decide whether to accept
  • Then accept or decline with the Handle Invitation Received action, or notify your team to review the request first

Why It Matters

  • Every connection request becomes a contact in your CRM — captured before you've even responded
  • Qualify senders against your criteria before accepting, instead of accepting blind or letting requests pile up
  • Choose your level of automation: fully automated handling, or a human-in-the-loop review flow

Read the New Invitation Received documentation

Workflow Trigger - New Follower

Every new follower is a warm signal of interest — and until now, it went uncaptured. The new New Follower trigger runs a workflow whenever someone follows your connected LinkedIn account, so you can turn that interest into a contact and a conversation while your account is still top of mind.

What's New

  • New workflow trigger that fires when the connected LinkedIn account gains a new follower
  • Followers are checked periodically throughout the day, and the trigger fires once per new follower
  • Returns the follower's Provider ID, Full Name, Headline, and Contact ID (when an existing contact matches)
  • Trigger status is visible in the account dashboard — open the sub-account details to see each trigger listed with a live Active indicator

How It Works

  • When the trigger fires, start with a Find Contact action using the Provider ID from the payload
  • If a contact is found, continue straight to your follow-up actions
  • If no contact is found, create one — then enrich it with Retrieve User Profile, tag it, or start an outreach workflow

Why It Matters

  • Capture every new follower as a contact in your CRM automatically — no more manually checking your follower list
  • Followers have already shown interest. Engaging while your account is top of mind beats cold outreach every time
  • Segment followers from connections to build audience-specific workflows and reporting

Read the New Follower documentation

Workflow Trigger - New Post Comment

Comment-to-lead campaigns used to mean watching your post and DMing every commenter by hand. The new New Post Comment trigger runs a workflow whenever someone comments on a post you select — with an optional keyword filter — so the whole play runs itself.

What's New

  • New workflow trigger that fires when someone comments on the selected LinkedIn post
  • Monitor posts on a personal profile or a business page — you choose the page and the post in the trigger filters
  • Optional keyword filter: only fire when the comment contains your keyword (e.g., "comment PROMPT to get the prompt pack")
  • Returns the commenter's profile details, the comment text, their network distance, and whether they're already a connection
  • Comments are checked periodically throughout the day, and the trigger fires once per new comment

How It Works

  • When the trigger fires, start with a Find Contact action using the Provider ID from the payload — and create the contact if none is found
  • Reply on the post with Reply To A Comment, or acknowledge it with React To A Comment
  • Branch on the Is Relationship field: send existing connections a direct message, and send everyone else a connection request

Why It Matters

  • Run comment-to-lead campaigns end to end — keyword comment in, resource delivered, contact captured — with no manual monitoring
  • Everyone who comments on your content has raised their hand. Capture them in your CRM and follow up while the post is still live
  • Branching on network distance means the right follow-up every time: message the connections, invite the rest

Read the New Post Comment documentation

Workflow Action - React To A Comment

Not every comment needs a written reply — some just need acknowledgment. React To A Comment adds a reaction to any comment on your posts straight from your workflow, paired with the New Post Comment trigger, so no one is left hanging on a high-volume post.

What's New

  • New workflow action that adds a reaction to a comment on the selected LinkedIn post
  • Takes the Comment ID and Post ID straight from the New Post Comment trigger, plus your chosen reaction type
  • Supports the same reaction types as React To A Post — Like, Celebrate, Support, Insightful, Curious
  • Optionally react as a company page instead of an individual
  • Requires a contact already resolved in the workflow — find or create one before this step runs
  • Returns a simple confirmation once the reaction is added

Why It Matters

  • Acknowledge every commenter automatically, even on posts with too many comments to reply to individually
  • Pair with Reply To A Comment for a two-tier strategy: react to everything, reply where it counts
  • Keeps engagement visible on the post without the effort of writing a reply for every comment

Workflow Action - Follow User

Following a prospect before you connect is one of the oldest warm-up plays on LinkedIn — and it's now a workflow action. Follow User follows any LinkedIn user from your connected account, using a Provider ID from a search step, a profile lookup, or straight from a trigger payload.

What's New

  • New workflow action that follows a specified LinkedIn user from the connected account
  • Takes a single input — Provider ID — sourced from Search UserRetrieve User Profile, or directly from triggers like New Follower and New Post Comment
  • Returns a simple confirmation once the follow completes

Why It Matters

  • Warm up a prospect before sending a connection request — your name shows up in their notifications first
  • Follow back new followers or engaged commenters automatically, as a low-friction show of interest
  • Build familiarity ahead of a bigger outreach campaign, so requests don't land cold

Workflow Action - Handle Invitation Received

Every connection request used to mean opening LinkedIn and deciding by hand. Handle Invitation Received accepts or declines pending requests straight from your workflow, paired with the New Invitation Received trigger for a fully automated screening pipeline.

What's New

  • New workflow action that accepts or declines a pending connection request on the connected LinkedIn account
  • Takes the Invitation ID and Shared Secret straight from the New Invitation Received trigger, plus your chosen action — Accept or Decline
  • Requires a contact already resolved in the workflow — find or create one before this step runs
  • Returns a simple confirmation once the invitation is handled

Why It Matters

  • Auto-accept qualified prospects the moment their request comes in, no manual review needed
  • Screen every request against your criteria — or route it through an AI check — before deciding
  • Chain a welcome message right after accepting, so new connections hear from you while it's still fresh

Workflow Action - Reply To A Comment

Comment-to-lead campaigns needed a public reply to feel real, and that meant doing it by hand. Reply To A Comment posts a reply to any comment on your posts straight from your workflow, paired with the New Post Comment trigger — mentions included.

What's New

  • New workflow action that posts a reply to a comment on the selected LinkedIn post
  • Takes the Comment ID and Post ID straight from the New Post Comment trigger, plus your reply text
  • Supports @mentioning the commenter — include {@mention} in your reply text and provide their name and Provider ID
  • Optionally reply as a company page instead of an individual
  • Requires a contact already resolved in the workflow — find or create one before this step runs
  • Returns a confirmation and the new reply's Comment ID

Why It Matters

  • Comment-to-lead campaigns now run end to end — keyword comment in, public reply and resource out, all automated
  • @Mentions make automated replies read as personal, not generic
  • Public replies keep your post active and visible to everyone else considering the same comment

Revamped Messaging Infrastructure

We've rebuilt the messaging system from the ground up for better speed and scalability, real 2-way sync and laid the groundwork for what's coming next — including multi-account support.

What's New

  • Faster message delivery — a rebuilt messaging system with real speed and scalability improvements
  • Built for what's next — new infrastructure laying the groundwork for future capabilities, including multi-account support and read receipts
  • Outbound messages sent from LinkedIn now sync automatically — send a message from LinkedIn directly and it now appears in the conversation thread in your CRM
⚠️
Connection request notes sync after acceptance, not on send. The note attached to a connection request won't appear in the conversation view until the connection is accepted. Notes aren't tied to an inbox at send time, so posting them immediately creates a duplicate entry once the connection has been accepted and the note is added to the inbox as a message. For this reason we removed the functionality of adding the message to the conversation on sending the connection request.

Why It Matters

  • A faster, more scalable messaging system keeps your CRM conversations in step with what's actually happening on LinkedIn
  • Every message now gets added to the conversation whether it was sent via a workflow, the message composer or LinkedIn itself.
  • This groundwork sets up bigger things — multi-account support read receipts, message editing and deletion.

Improved Activity Logs

Activity Logs now show the full round trip for every workflow action — not just the end result. When something fails, you can see exactly where.

What's New

  • Workflow actions now log three stagesRequest (what was sent from your workflow), Response (what came back from the provider), and Returned (what was passed back to your workflow)
  • Workflow triggers log two stagesResponse and Returned, since triggers don't send an outbound request
  • Status indicator on every stage — green for a successful (200) response, red if that specific stage failed
  • Each stage is expandable, so you can inspect the exact payload sent or received at that point

Why It Matters

  • Pinpoint exactly where a failure happened — the request, the provider response, or what came back to your workflow — instead of guessing from a single pass/fail result
  • Confirm what was actually sent and received at each step when a workflow doesn't behave as expected
  • Faster troubleshooting means fewer support tickets and quicker fixes when something goes wrong

Retry Activity Log Failures

The Activity Logs now let you retry a failed workflow action without re-running the whole workflow.

Overview

When an action fails for a small, transient reason — a temporarily disconnected account, a provider hiccup — you no longer have to re-trigger the contact from the top of the automation. Open the failed action, hit Retry, and it's requeued and re-attempted on the spot.

What's New

  • Retry button on failed workflow actions — available at the bottom of each failed action in the Activity Logs
  • Instant requeue — the activity is re-attempted immediately and the result updates in the log
  • No workflow re-run required — recover a single failed action without re-triggering the contact through the whole automation
  • Clear success/fail result — see straight away whether the retry succeeded

Why It Matters

Some failures aren't your workflow's fault. An account drops its provider connection for a moment, or a request times out — the setup is fine, the timing just wasn't. Before, recovering meant re-running the automation. Now it's one click.

  • No more re-triggering a whole workflow to recover one failed action
  • Triggers contacts to progress through workflow when stuck waiting for a response.

Send Video and Voice Messages on LinkedIn

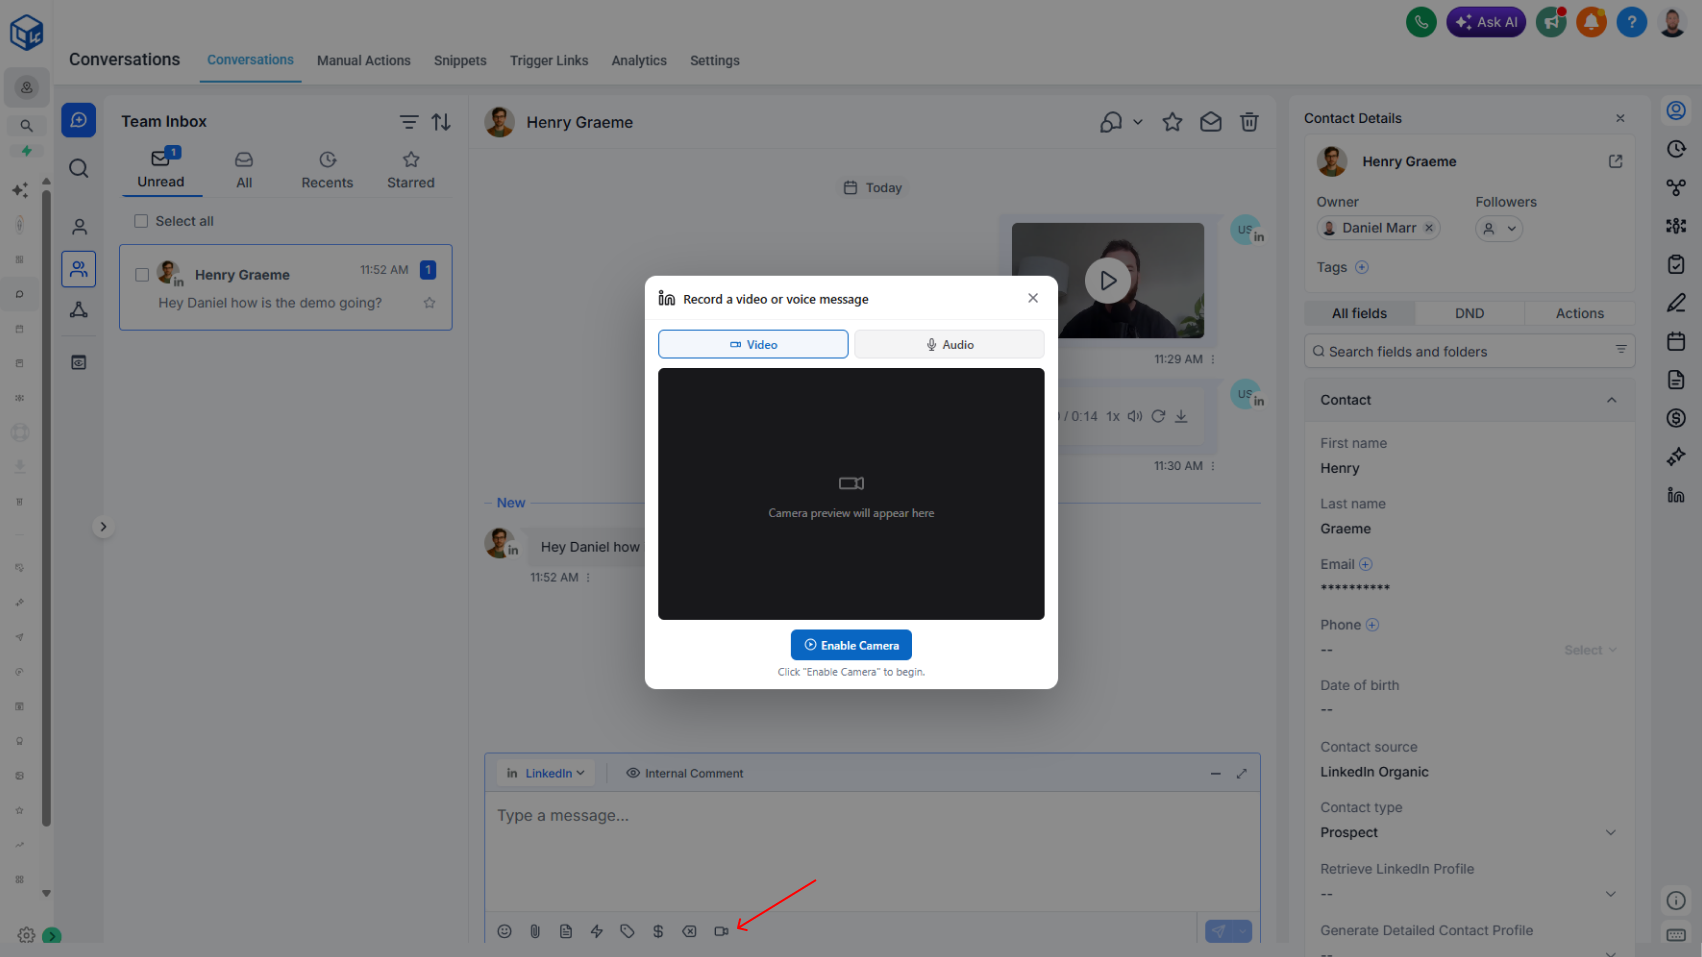
You can now record and send video and voice messages to LinkedIn connections directly from the conversation inbox.

Overview

Switch to the LinkedIn messaging provider, hit record, and send. The recipient gets a native video or audio message in their LinkedIn inbox — no app-switching, no manual upload, no separate tool.

What's New

  • In-app video recording in the LinkedIn message compose box
  • In-app voice recording in the LinkedIn message compose box
  • Native delivery — messages land as video or audio in the recipient's LinkedIn inbox
  • Background processing — files are optimized automatically before sending
  • Playback preview for voice messages before you hit send

Why It Matters

  • Higher engagement than text — video and voice stand out in a LinkedIn inbox full of typed replies
  • No app-switching — record, review, and send without leaving your CRM
  • Personalized at scale — break the "another templated message" pattern with a face or a voice
  • Faster than typing — say it in 20 seconds instead of typing for two minutes

Limits

  • Video – up to 60 seconds
  • Voice – up to 60 seconds

See the Video and Voice Messages documentation for step-by-step setup and usage.

Improved Send InMail Action with Automatic Chat ID Updates

We've improved the Send InMail action so it writes the Chat ID back to the contact record automatically.

Overview

You no longer need a separate Update Contact action after every Send InMail. As long as your Chat ID field is mapped (it already needs to be), the action handles it for you.

What Changed

Chat ID written to the contact automatically

When the action runs, the returned Chat ID is written to the mapped Chat ID custom field on the contact — no extra workflow step required. That keeps contact lookups and reply-to-last-message logic working without any manual wiring.

No more Update Contact action after Send InMail

Workflows that previously included an Update Contact step to map the Chat ID onto the contact can drop that step entirely. The action now handles it directly.

Why This Matters

  • Fewer actions per workflow
  • No manual Chat ID handling
  • Reliable contact lookup and message threading on follow-ups
  • Cleaner InMail automations

How to Update Your Workflows

  1. Confirm the Chat ID field is mapped in your CRM at App Marketplace → Installed Apps → LinkedConnector (this is a required mapping, so it should already be in place — just double-check)
  2. In your existing InMail workflows, delete any Update Contact actions that were storing the Chat ID after Send InMail
  3. Save and publish

From the next InMail onward, the Chat ID will be written to the contact automatically.

Improved Send A Message Action with Automatic Chat ID Updates

We've improved the Send A Message action so it writes the Chat ID back to the contact record automatically.

Overview

You no longer need a separate Update Contact action after every Send A Message. As long as your Chat ID field is mapped (it already needs to be), the action handles it for you.

What Changed

Chat ID written to the contact automatically

When the action runs, the returned Chat ID is written to the mapped Chat ID custom field on the contact — no extra workflow step required.

No more Update Contact action after Send A Message

Workflows that previously included an Update Contact step to map the Chat ID onto the contact can drop that step entirely. The action now updates the field directly.

Consistent behavior across conversations and workflows

We already update the Chat ID on contact records during normal LinkedIn conversations. Send A Message now follows the same behavior, so the field stays accurate regardless of how the message originated.

Why This Matters

  • Fewer actions per workflow
  • No manual Chat ID handling
  • Cleaner messaging automations
  • Contact records stay in sync with every outbound message

How to Update Your Workflows

  1. Confirm the Chat ID field is mapped in your CRM at App Marketplace → Installed Apps → LinkedConnector
  2. In your existing messaging workflows, delete any Update Contact actions that were storing the Chat ID after Send A Message
  3. Save and publish

That's it. From the next send onward, the Chat ID will be written to the contact automatically.

Improved Send Invitation Action with Automatic Status and ID Updates

We've improved the Send Invitation action so it writes the invitation status and invitation ID to your contact custom fields automatically.

Overview

You no longer need a separate Update Contact action after every invitation. As long as your advanced fields are mapped, the values flow through in the background.

What Changed

Invitation status and ID written automatically

When the action runs, the backend updates the contact's Invitation Status and Invitation ID custom fields directly — no extra workflow steps required.

New field to map: Invitation ID

The Invitation ID field is a new addition to the advanced field mapping. Map it once and every subsequent invitation will populate it on the contact record.

No more Update Contact action after Send Invitation

Workflows that previously needed an Update Contact step to store invitation data can now drop it. The action takes care of writing the values for you.

Why This Matters

  • Fewer actions per workflow
  • No manual handling of invitation status or ID
  • Cleaner outreach automations
  • Contact records stay accurate without extra wiring

How to Set It Up

  1. Open your CRM and head to App Marketplace → Installed Apps → LinkedConnector
  2. Open the Advanced Fields mapping
  3. Make sure every field is mapped — and confirm Invitation ID is mapped (this one is new)
  4. Save the mapping
  5. In your existing invitation workflows, delete any Update Contact actions that were storing Invitation Status or Invitation ID — the action handles both now
  6. Save and publish

Once mapped, every contact that runs through Send Invitation will have Invitation Status and Invitation ID updated automatically.

Improved New Message Trigger with Direct Contact ID

We've improved the New Message trigger to simplify workflow building and remove unnecessary steps.

Overview

The trigger now passes the Contact ID directly. Your downstream actions can find the sender straight from the trigger output — no separate Provider ID and Chat ID lookup needed.

What Changed

Contact ID now flows through the trigger

The backend resolves the Contact ID from the inbound message and passes it into the trigger output. Workflows can wire Find Contact by Contact ID directly off the trigger.

Provider ID and Chat ID lookup handled in the backend

Previously, workflows needed one lookup by Provider ID with a fallback by Chat ID for redundancy. That logic now lives on our side. The trigger output gives you a single Contact ID to work with.

Wait step no longer required

The 15-second wait that previously sat between the trigger and the contact lookup is no longer needed.

Why This Matters

  • Fewer actions per workflow
  • No 15-second delay before lookup
  • Cleaner, more maintainable V5 (and earlier) workflows
  • Faster end-to-end execution

How to Update Your V5 Workflow

  1. Open your existing New Message workflow
  2. Delete the old Provider ID lookup and the Chat ID fallback lookup
  3. Add Find Contact, change the reference field to Contact ID
  4. Map Contact ID from the New Message trigger
  5. Save the action, then move Find Contact directly under the trigger
  6. Delete the 15-second wait step
  7. Save and publish

If Provider ID or Chat ID aren't mapped yet, head to LinkedConnector → Getting Started → Map Fields and reconnect both before publishing — the backend uses them to resolve the Contact ID.

Improved New Connection Trigger with Direct Contact ID

We've improved the New Connection trigger to simplify workflow building and remove unnecessary steps.


Overview

The trigger now passes the Contact ID directly, so your downstream actions can look up the contact straight from the trigger output — no separate Provider ID and Public ID resolution needed.

What Changed

Contact ID now flows through the trigger

The backend resolves the Contact ID from the new connection and passes it into the trigger output. Workflows can wire Find Contact by Contact ID directly off the trigger.

Wait step no longer required

The 15-second wait that previously sat between the trigger and the contact lookup is no longer needed.

Provider ID and Public ID still required as backup

Behind the scenes, the lookup uses Provider ID first and falls back to Public ID. Make sure both fields are mapped in Map Fields so the Contact ID resolves correctly.

Why This Matters

  • Fewer actions per workflow
  • No 15-second delay before lookup
  • Cleaner, more maintainable V5 workflows
  • Faster end-to-end execution

How to Update Your V5 Workflow

  1. Open your existing New Connection workflow
  2. In Find Contact, change the lookup field to Contact ID
  3. Map Contact ID from the trigger
  4. Save the action, then move Find Contact directly under the trigger
  5. Delete the 15-second wait step
  6. Save and publish

Send Personalised AI Videos on LinkedIn With HeyGen

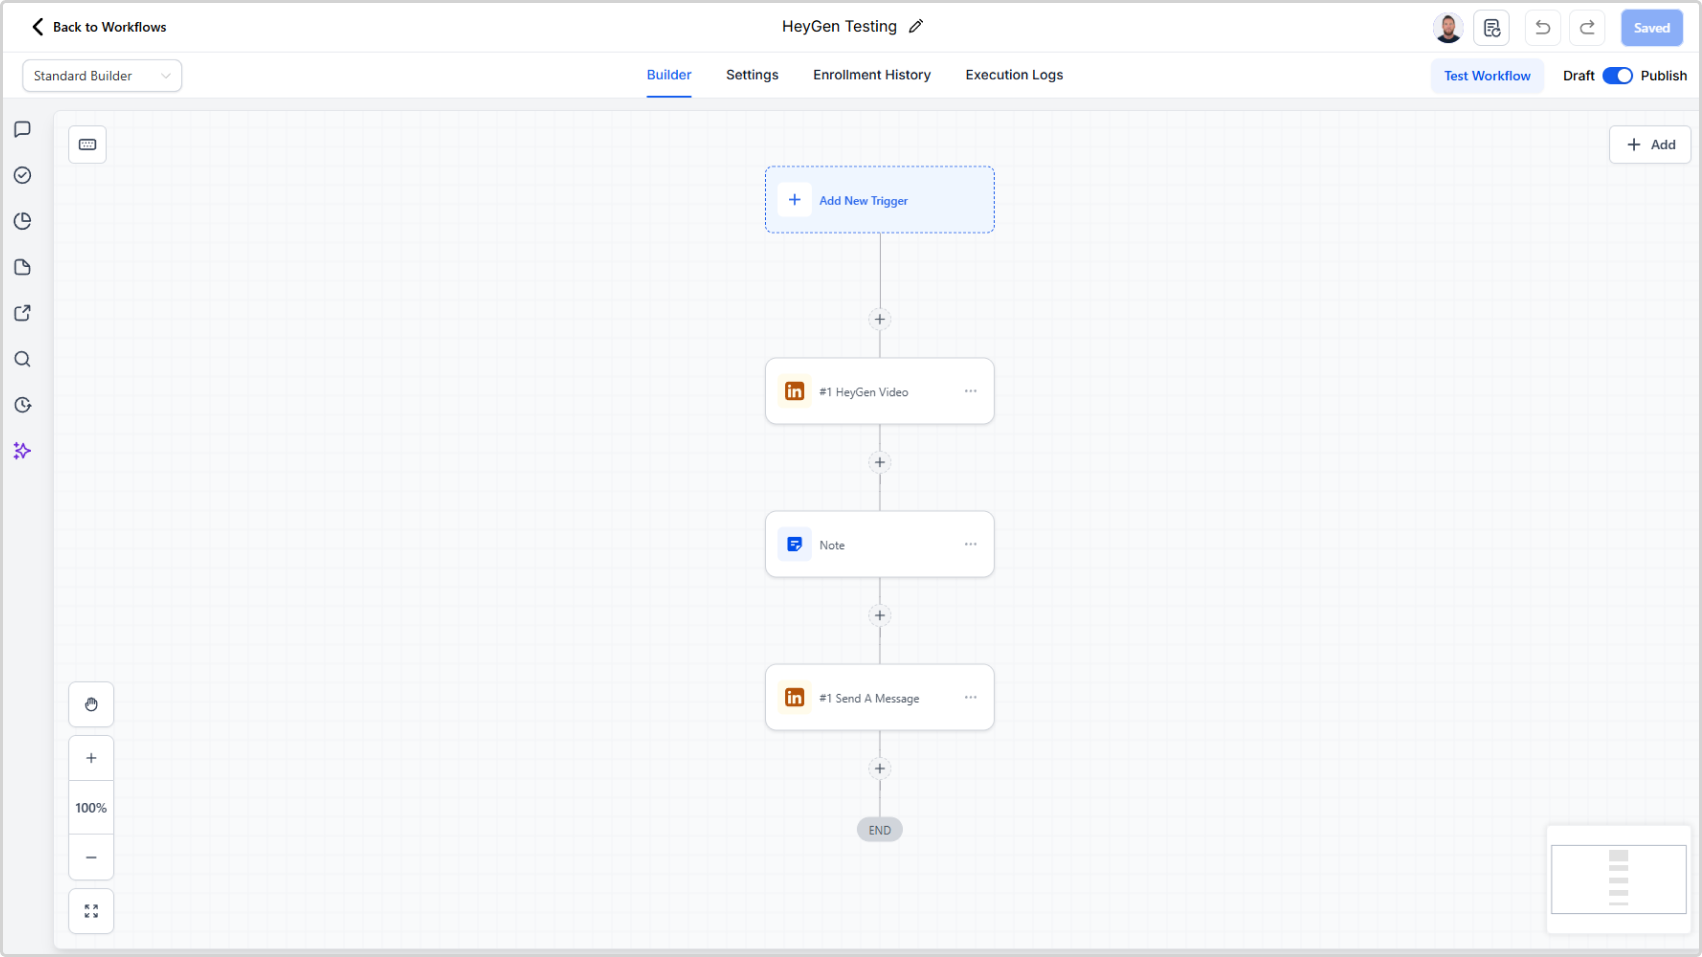
A new workflow action lets you generate AI videos using HeyGen and send them directly to LinkedIn contacts. Write a script, choose an avatar and voice, and the video is generated and delivered — automatically, at scale.

What's New

  • New HeyGen Generate Video workflow action that generates a video from a script, avatar, voice ID, aspect ratio, and title
  • Videos are generated via your HeyGen account and returned as a direct video URL
  • Pass the video URL variable straight into the Send A Message action to deliver it as a LinkedIn video message
  • Personalise scripts with dynamic variables so each video feels tailored to the recipient
  • API key configuration is handled in App Marketplace > LinkedConnector > API Configuration

Why It Matters

Video messages on LinkedIn stand out. They're harder to ignore and easier to connect with than plain text. Until now, sending a video required recording, uploading, and manually attaching a file to each message.

With this action, the entire process runs inside your workflows. A personalised AI video — using your chosen avatar and voice — is generated from a script and sent without any manual steps. It brings the kind of outreach that used to take hours per contact down to a single workflow action.

HeyGen Generate Video · Send A Message

Link and View LinkedIn Profiles Directly on Contact Records

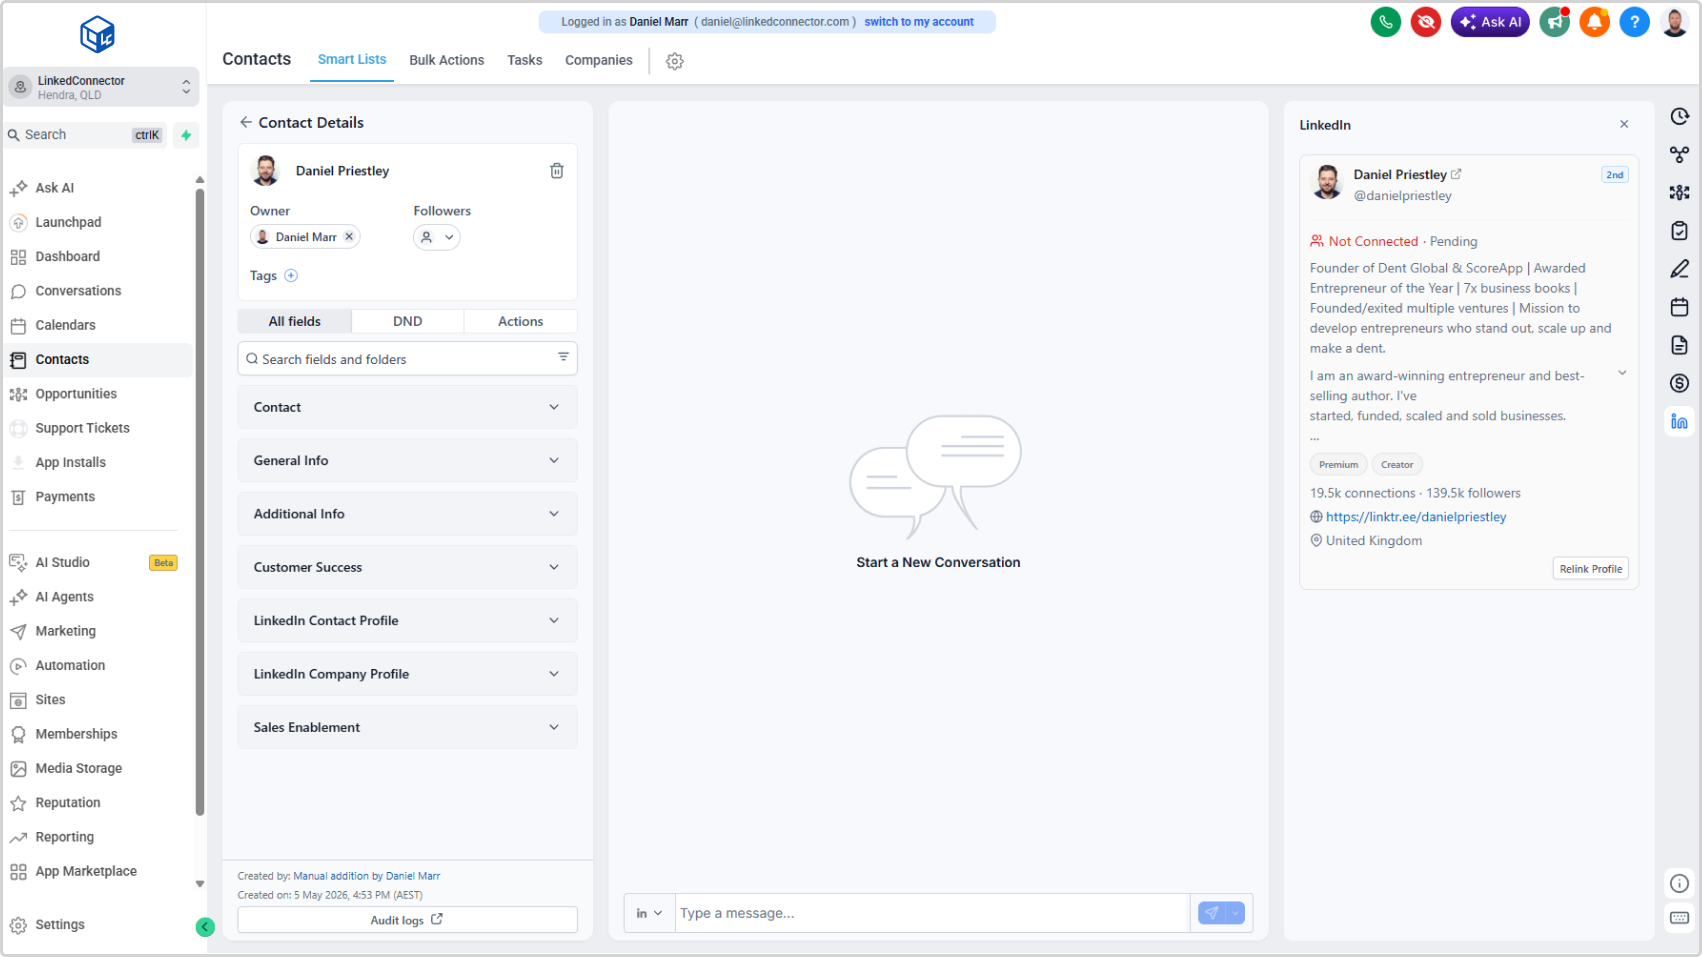
A new LinkedIn Contact Card now sits in the right sidebar of every Contact and Conversations record. Search for a LinkedIn profile, link it to the contact in a few clicks, and see their full profile summary — connection status, followers, premium badges, location, and more — without leaving the CRM.

What's New

  • A LinkedIn Contact Card available on every Contact and Conversations record in the right sidebar
  • Search for a LinkedIn profile using the contact's name and business — results show name, headline, location, public ID, and connection degree
  • Scroll and load more results to find the right person
  • Link the profile with one click — basic profile data is retrieved and stored in the contact's custom fields automatically
  • The card displays connection status, Premium and Creator badges, connections, followers, website links, location, and profile summary
  • Relink Profile button refreshes the data at any time to keep profile information current
  • Enable or disable the card per sub-account from the Sub Account Details modal in the agency dashboard
  • Available on both the Contact page and the Conversations page for in-context reference while messaging

Why It Matters

Before this, there was no way to see a contact's LinkedIn profile details inside the CRM without switching tabs. You either searched manually on LinkedIn or relied on data that was imported separately.

The LinkedIn Contact Card changes that. Link a profile once and the key details are right there — visible while you're messaging, while you're reviewing a contact, while you're building a workflow. It brings LinkedIn context into the place where you're already working.

For deeper data — work history, education, skills — enrol the contact in a workflow and use the Retrieve User Profile action to pull the full profile into your custom fields.

LinkedIn Contact Card

Custom Menu Links Are Now Created Automatically

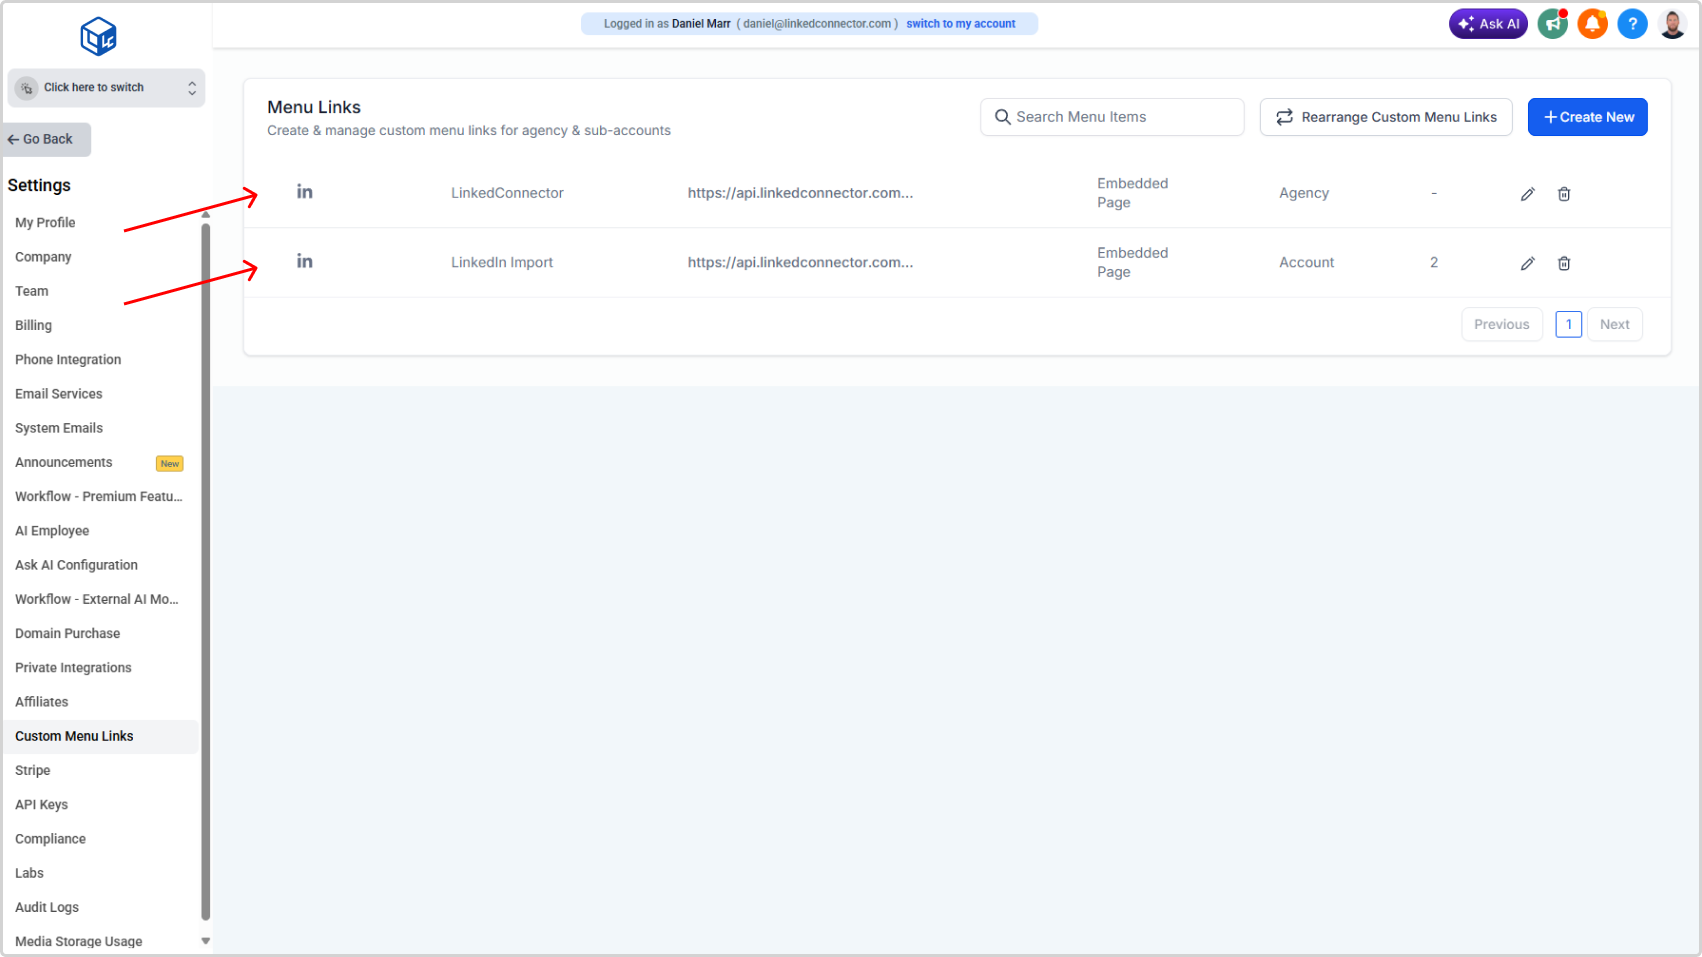
New agency installations no longer require manual setup of custom menu links. The LinkedIn dashboard link and the LinkedIn import tool are now created automatically the moment you install LinkedConnector.

What's New

  • Both custom menu links — the agency dashboard link and the LinkedIn import tool — are automatically created for new agency installations
  • No manual link creation required for either tool
  • To display the import tool in a sub-account, administrators simply navigate to the existing link and assign the sub-accounts where it should appear
  • The app must be connected at any sub-account before the import tool becomes active there

Why It Matters

Previously, setting up custom menu links was a manual process — find the settings, create each link, enter the correct URL, configure the sidebar and role visibility, and save. Two separate links, every installation.

That step is gone. The links are ready when the installation is complete. For the import tool, all that's left is selecting which sub-accounts should have access. It's one less configuration step during onboarding and one fewer place where something can go wrong.

⚠️
Note: Prior to 04/03/26 Custom menu links will need to be manually configured as per the below article.

Add Custom Menu Links

New Onboarding Assistant

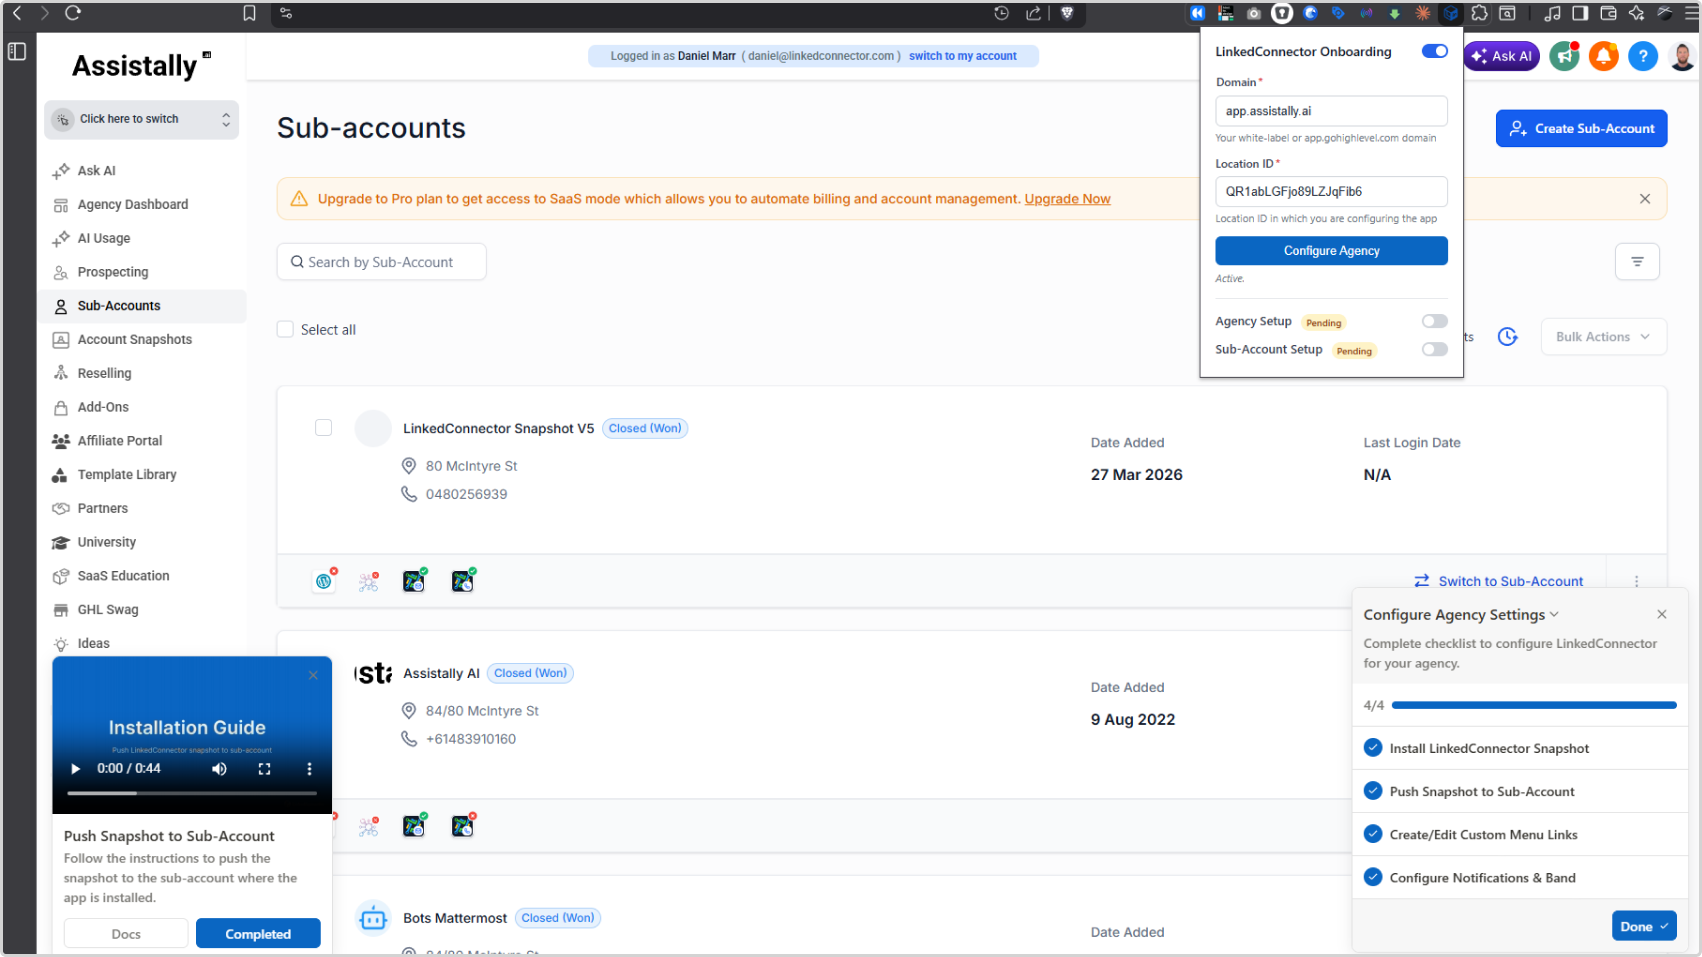
Getting your agency and sub-accounts configured just got a lot easier. The new LinkedConnector onboarding extension walks you through every setup step in order — with video walkthroughs, documentation links, and progress tracking built in.

What's New

  • A Chrome extension that guides you through the full onboarding process from start to finish
  • Separate checklists for agency setup and sub-account setup, each with step-by-step instructions
  • Video walkthroughs and documentation links available at every step — no searching required
  • Progress tracking shows your current status for agency and sub-account setup at a glance
  • Multi-sub-account support — configure additional sub-accounts by updating your Location ID and running the sub-account flow again
  • Toggle the extension on or off at any time from your browser toolbar

Why It Matters

First-time setup used to mean jumping between documentation, tracking your place manually, and figuring out the right order. The onboarding extension removes all of that. It redirects you to the right page, shows you exactly what to do, and marks each step complete as you go. Agency configuration only needs to be done once — after that, adding new sub-accounts takes a fraction of the time.

Get the Extension · User Guide

Custom Field Mapping Is Now a Searchable List

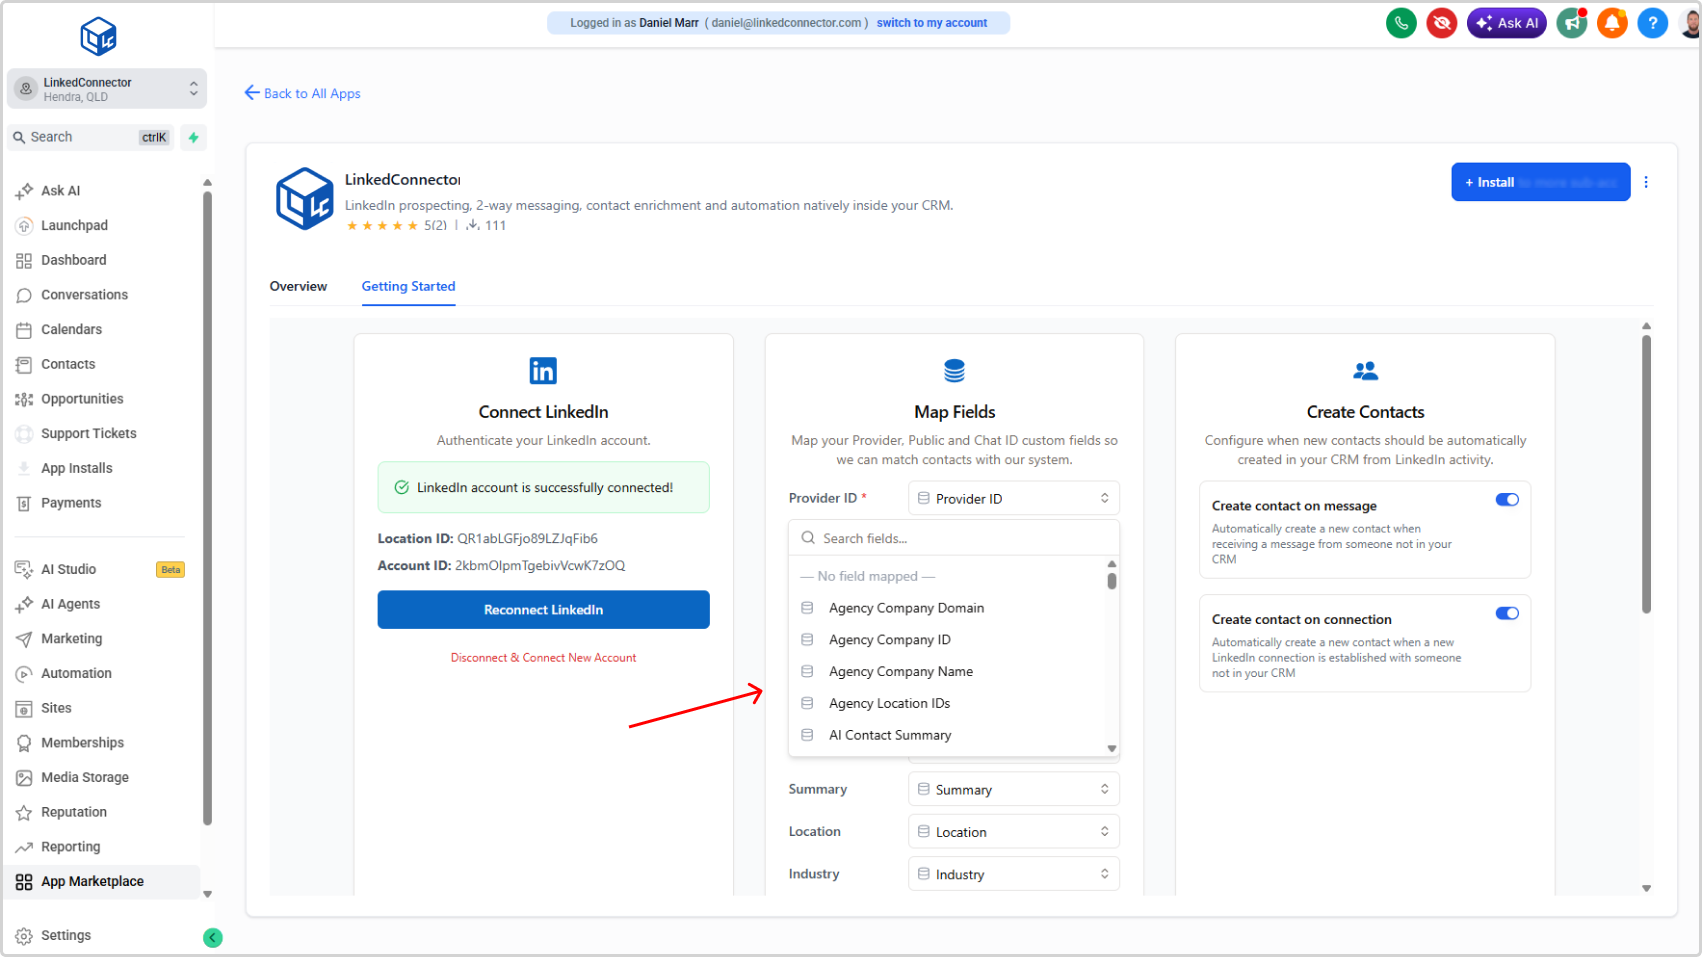
Mapping your CRM fields to LinkedIn data is now significantly faster and simpler. Instead of manually copying field keys and pasting them into open text fields, you can now retrieve your sub-account's custom fields directly and select them from a searchable list.

What's New

  • Custom fields are now retrieved directly from your sub-account — no manual copying required
  • A searchable dropdown replaces open text input, so you can find the right field by name in seconds
  • All available CRM custom fields appear in the list, making it easy to confirm you're selecting the correct one

Why It Matters

The old approach required switching between your sub-account settings and the mapping page, copying field keys, and pasting them in without any visual confirmation. One wrong character and the mapping would fail silently.

The new flow keeps everything in one place. Search for the field name, select it from the list, and move on. It reduces setup time, eliminates copy-paste errors, and means field mappings work correctly the first time — so LinkedIn data publishes to the right CRM fields from day one.

Map Custom Fields

Upgraded Retrieve Last Post with Built-In Branching

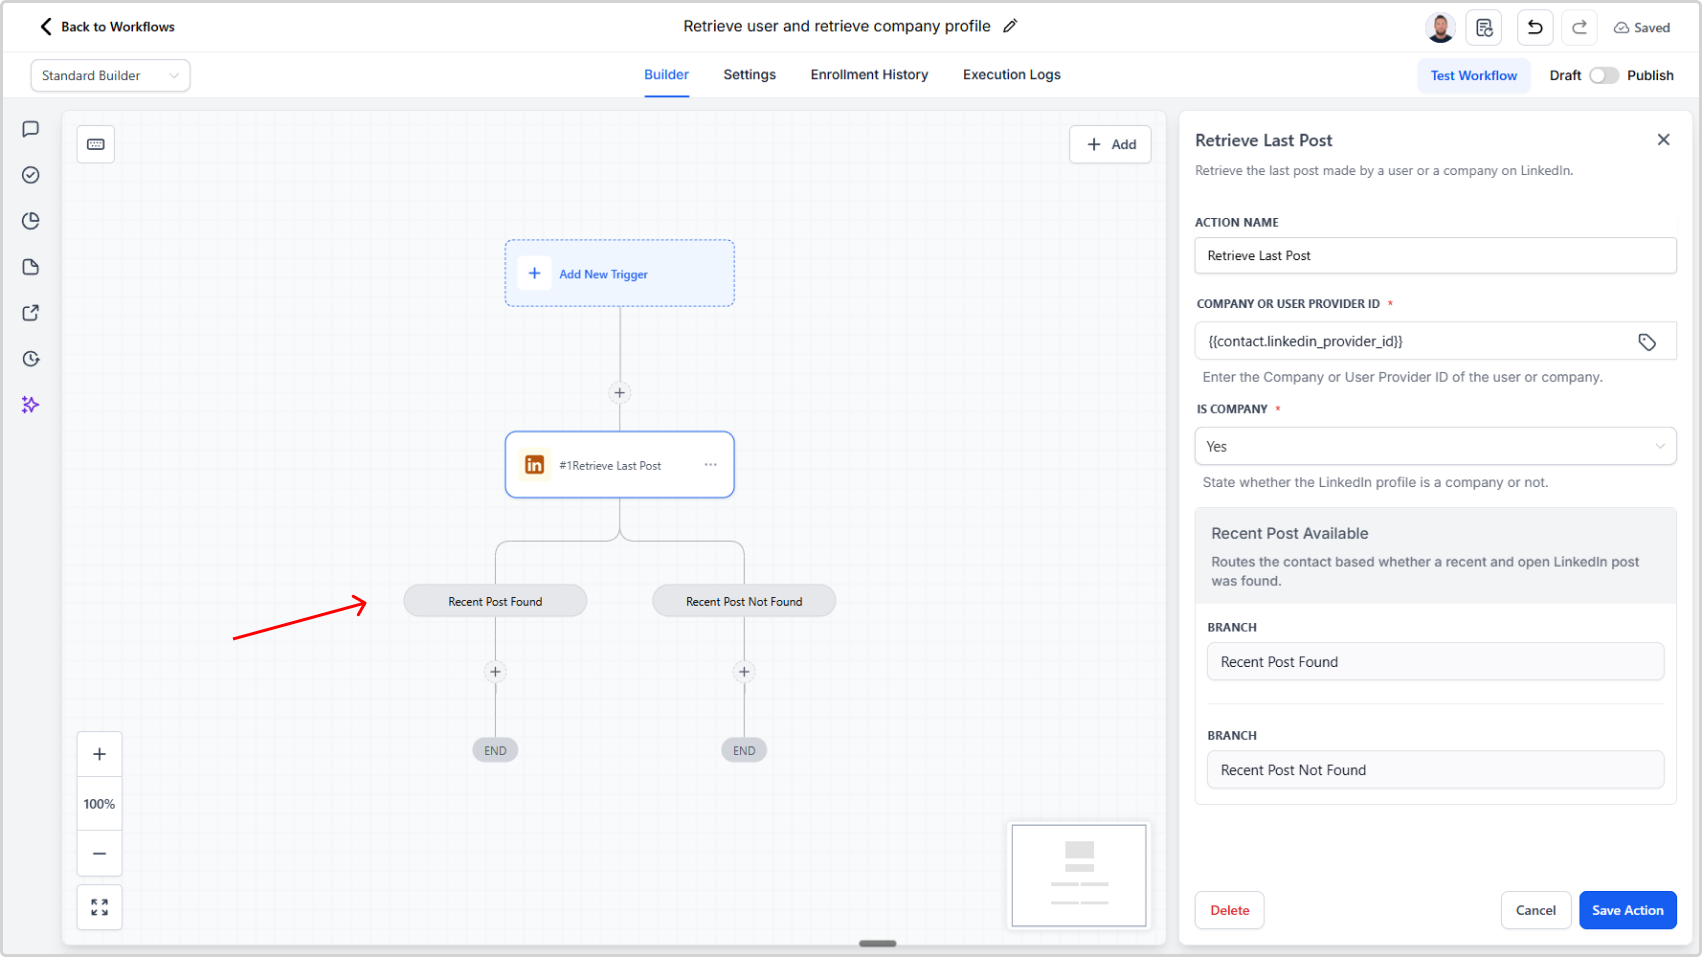
Retrieve Last Post now includes built-in found/not found branching based on post eligibility, removing the need for extra if-else actions in your workflows.

Overview

We’ve upgraded Retrieve Last Post to automatically evaluate whether a valid recent post is available and route the workflow to the correct branch.

This reduces workflow complexity and cuts down the number of actions required.

What Changed

Built-in branch outcomes

Retrieve Last Post now routes to:

  • Recent post found when an eligible post is available
  • Recent post not found when no eligible post is available

Eligibility checks now handled automatically

The action now checks whether the post:

  • Is recent (within one month)
  • Is public
  • Supports react/comment actions
  • Is not a share

If all criteria are met, the workflow continues through Recent post found.
If any criteria are not met, it continues through Recent post not found.

Why This Matters

  • No separate if-else action needed after Retrieve Last Post
  • Fewer workflow actions
  • Cleaner workflow logic
  • Simpler setup and maintenance

Impact

Workflows that previously used additional conditional logic after Retrieve Last Post can now rely on the action’s built-in branching and be streamlined.

Upgraded Search User and Search Company Actions with Built-In Branching

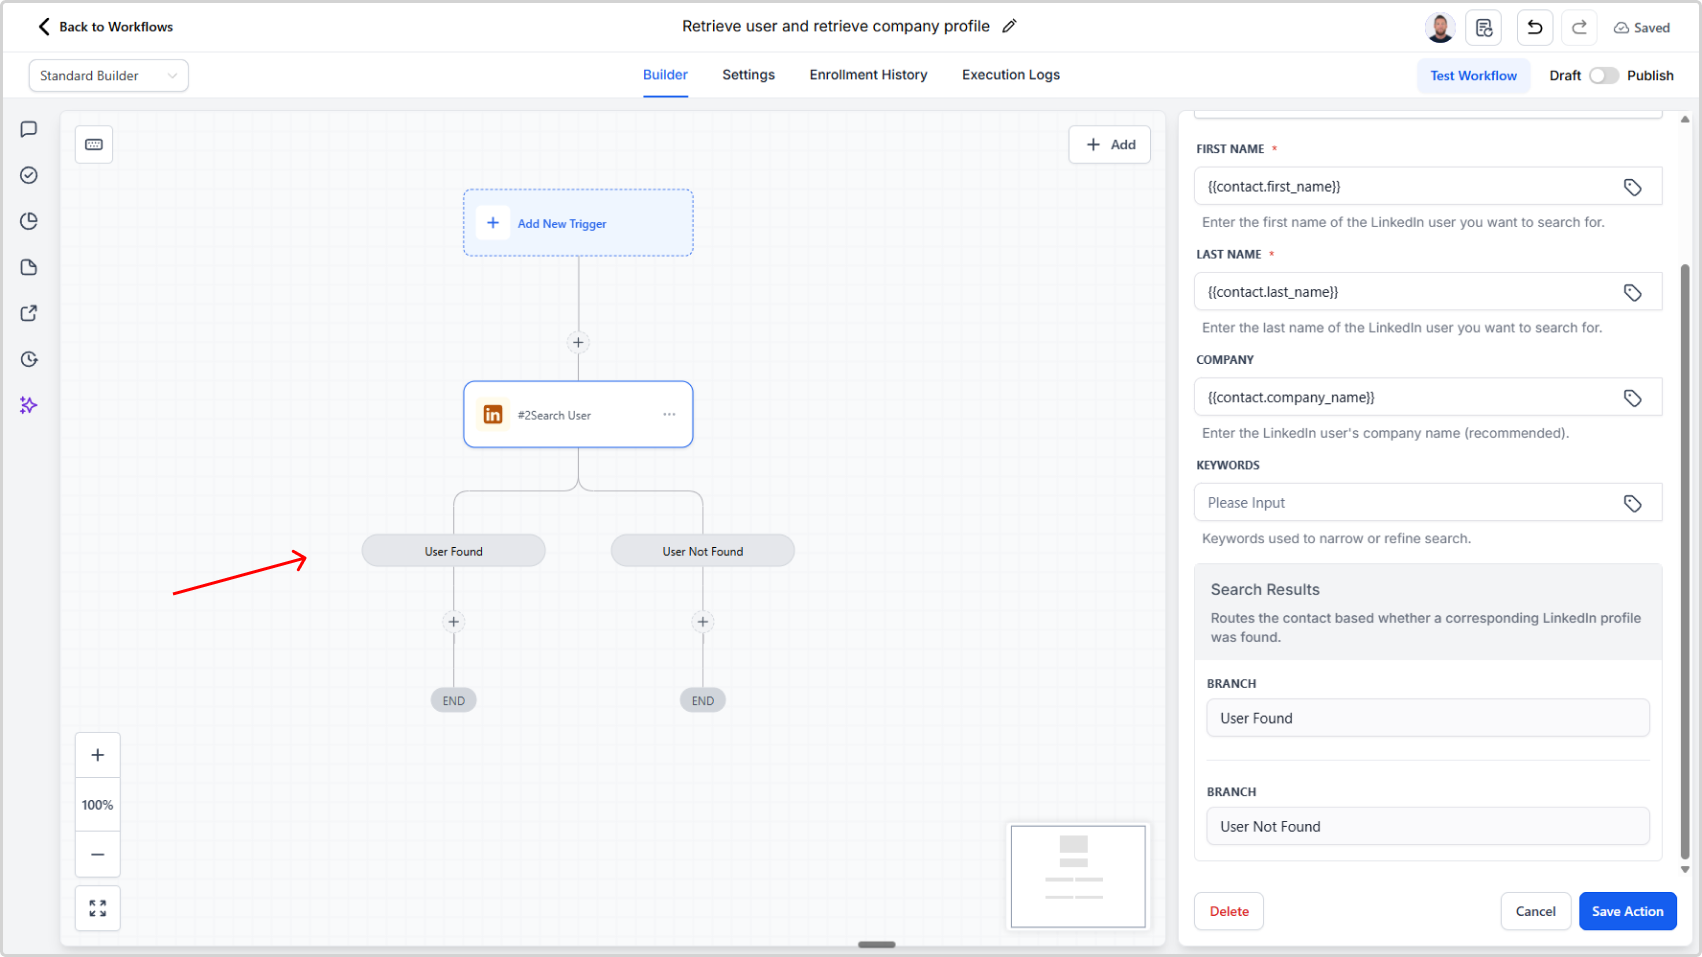
We’ve upgraded search user and search company with built-in found/not found branches, so workflows no longer need separate if-else actions after these steps.

Overview

We’ve improved the search user and search company actions to simplify workflow building and reduce action count.

These actions now include built-in branching logic that automatically handles whether a result is found.

What Changed

New built-in branches

Both actions now route automatically to:

  • User found / Company found branch when a match is found
  • User not found / Company not found branch when no match is found

Backend result handling

The backend now determines the search outcome and routes the workflow to the correct branch automatically.

Why This Matters

  • No extra if-else step needed after search user or search company
  • Fewer actions per workflow
  • Simpler workflow design
  • Lower complexity for users building automations

Impact

If your current workflows use if-else actions immediately after search user or search company to check for found/not found outcomes, you can now replace that logic with the built-in branches and streamline your flow.

Improved Retrieve User and Company Profile Actions

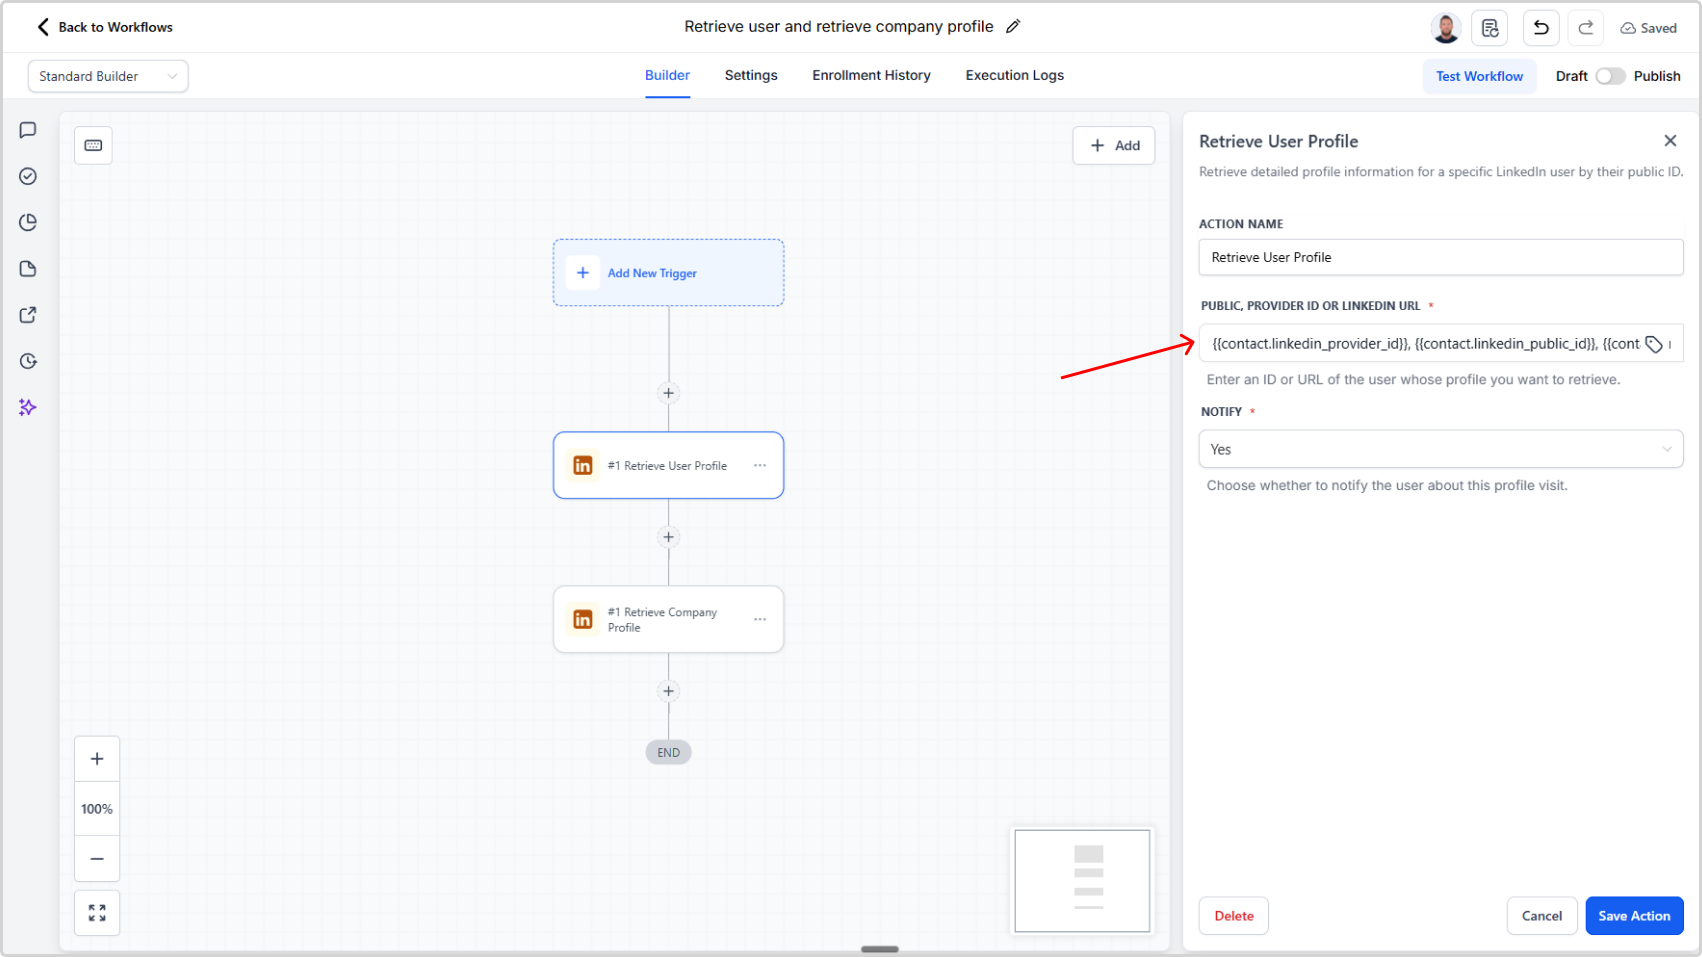
We’ve improved retrieve user profile and retrieve company profile to accept comma-separated identifiers in a single input, so workflows no longer need multiple branches for different identifier types.

Overview

The retrieve user profile and retrieve company profile actions are now more flexible and workflow-friendly.

Previously, each action could only accept one identifier type at a time. If your workflow might receive different identifier types, you had to build separate branches to handle each case.

Now, both actions support comma-separated input values, so you can provide multiple identifier types in one field.

What Changed

Before

Each action accepted only one of the following per run:

  • Provider ID
  • Public ID
  • LinkedIn profile URL

This often required multiple workflow branches.

Now

Both actions accept a single comma-separated input containing any combination of:

  • Provider ID
  • Public ID
  • LinkedIn profile URL

Why This Matters

  • Fewer workflow branches
  • Simpler action configuration
  • Cleaner and more maintainable automation logic

Example

{{contact.linkedin_provider_id}}, {{contact.linkedin_public_id}}, {{contact.linkedin_profile_url}}
New Notification System for App & LinkedIn Events

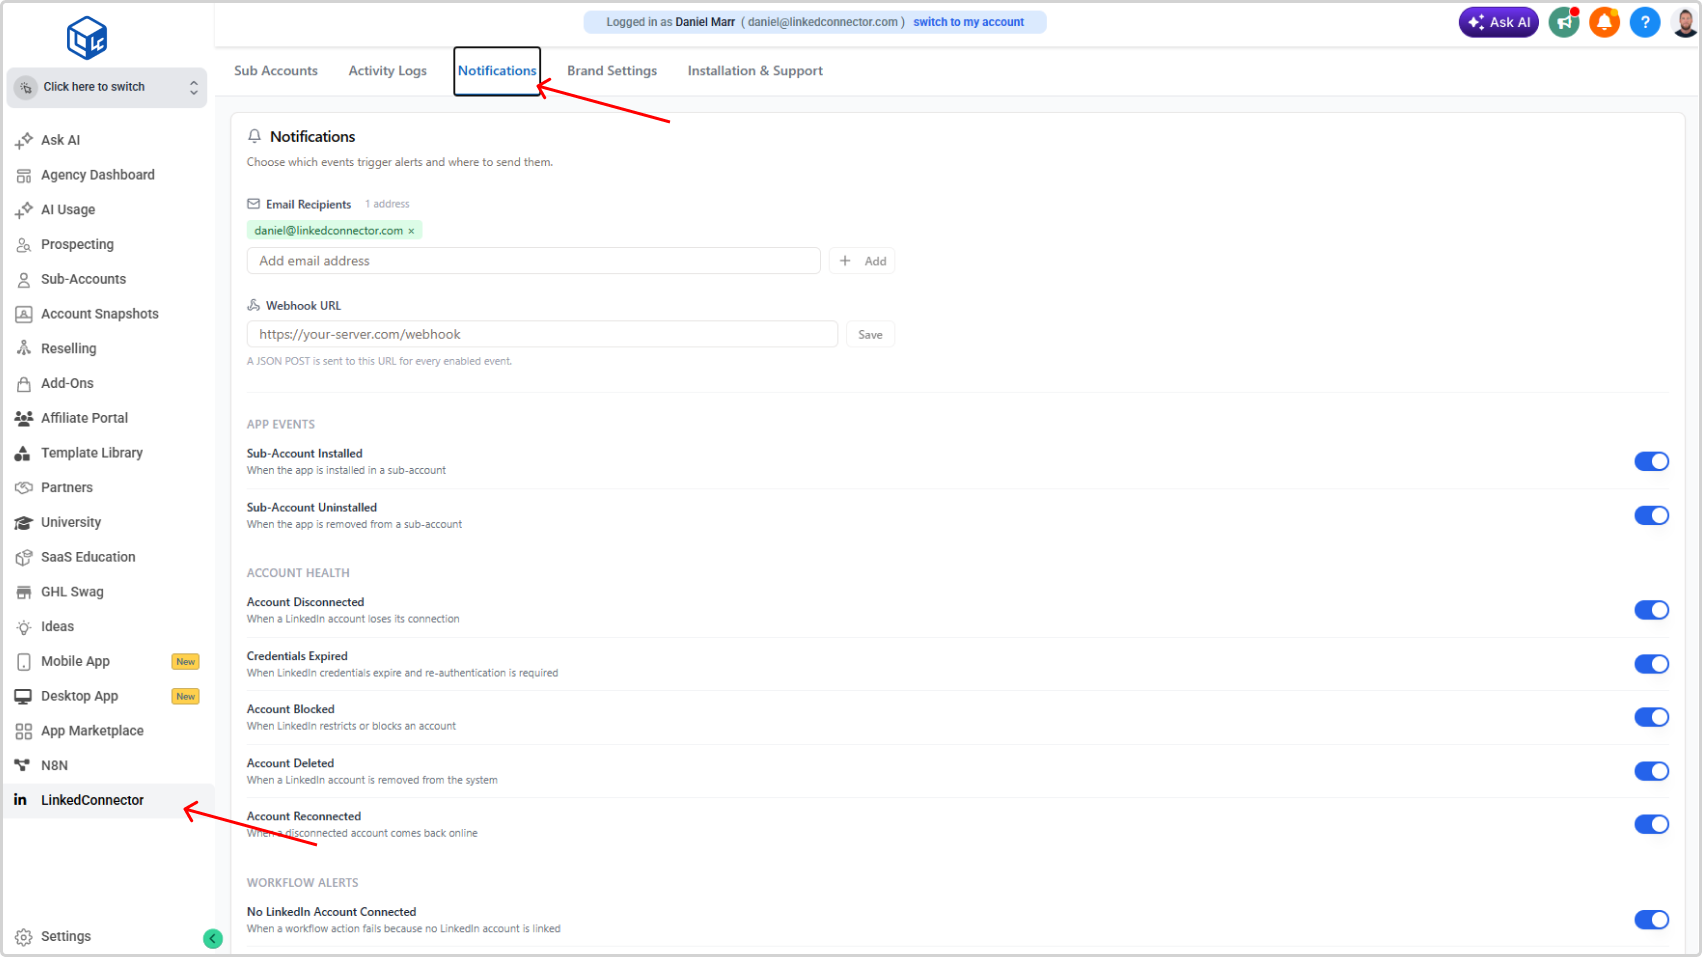
You can now receive real-time alerts via email and webhook for app lifecycle events and LinkedIn account health events. Configure recipients and endpoints once in the Notifications tab — no polling required.

What's New

  • Email and webhook notifications for critical events
  • Configurable per event type — enable only what you need

App Events: Sub-Account Installed, Sub-Account Uninstalled

Account Health: Account Disconnected, Credentials Expired, Account Blocked, Account Deleted, Account Reconnected

Workflow Alerts: No LinkedIn Account Connected, Insufficient Credits

Why It Matters

Know the moment a LinkedIn account disconnects or credentials expire — before it causes workflow failures — and automate your response with webhook-triggered systems.

Notifications — Agency Management Dashboard

Apply CRM Tags During LinkedIn Contact Import

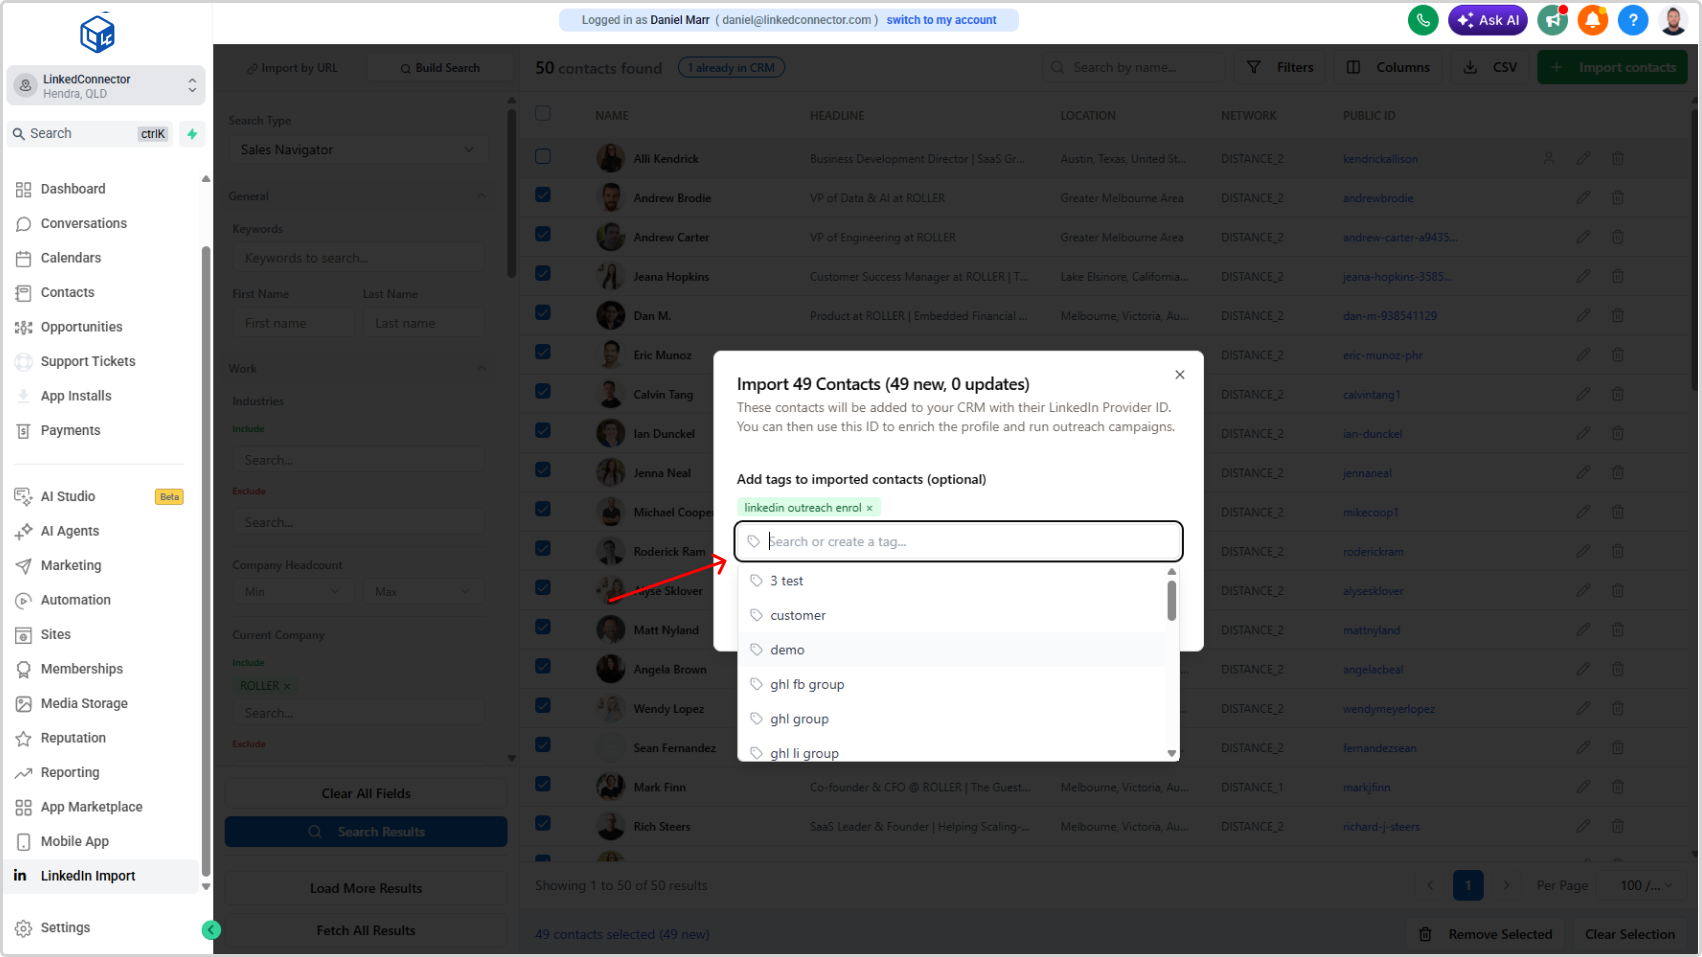
You can now search, select, and create CRM tags while importing LinkedIn contacts with the LinkedConnector import tool.

What’s New

We’ve added additional tagging support to the LinkedIn contact import flow in LinkedConnector.

When importing contacts to your CRM, you can now:

  • Search existing CRM tags
  • Select one or more tags to apply
  • Create new tags directly in the import modal

This update is available to all users.

How to Get the Update

If you do not see this feature yet, or experiencing any issues you may need to update the LinkedConnector App so we have the permissions to search tags in your CRM:

  1. Go to App Marketplace
  2. Select Installed Apps
  3. Select LinkedConnector
  4. Click Update in the top-right corner

After updating, the tagging option should function correctly.

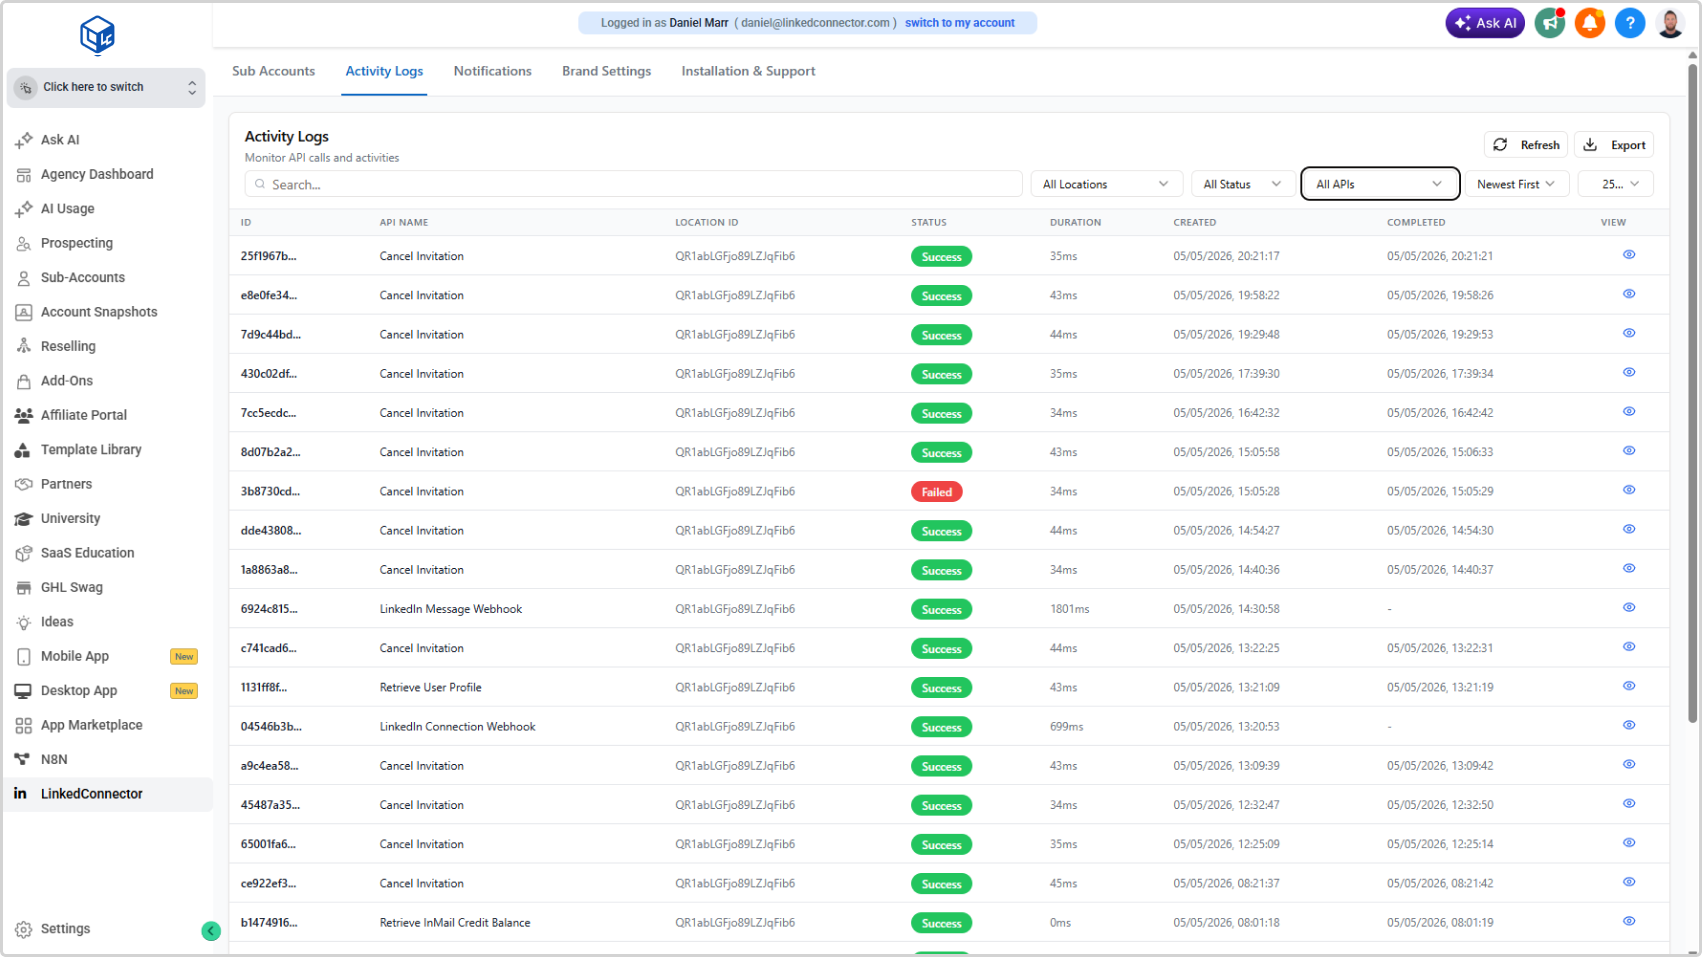
Activity Logs Relocated to Agency Dashboard

Activity Logs have moved from the sub-account Getting Started page to the Agency Dashboard. Sub-accounts no longer see operational monitoring data — that visibility now sits exclusively at the agency level.

What Changed

  • Activity Logs removed from the sub-account Getting Started page
  • Activity Logs now available only in the Agency Dashboard
  • All existing log data and functionality remains unchanged — just relocated

Agency Management Dashboard